Some time ago, I was assigned the task of implementing a File Integrity Monitoring (FIM) solution for PCI-DSS compliance. At that time, I was managing Cortex XDR as the company’s Endpoint Protection, but it did not include a dedicated FIM module. Although purchasing a new program would have been the simplest solution, I wanted to avoid unnecessary costs and the additional maintenance required for another agent on our servers.
During my research, I found a whitepaper titled Palo Alto Networks Cortex XDR and PCI Compliance, which states:


This whitepaper confirmed that FIM could be achieved using our existing Endpoint Protection. However, I faced two challenges:
- Creating BIOC rules.
- Determining what to monitor for changes.
The first issue was relatively straightforward. I appreciate the intuitive interface of Palo Alto Cortex XDR, which makes everything easy to find. The XQL language is simple to learn, and the reliability of the endpoint agents and dashboard is excellent.
The second issue was more complex. Unlike dedicated FIM solutions that come with templates, I had to find a source for the necessary information. Eventually, I found guidance in the article File Integrity Monitoring in Microsoft Defender for Cloud.
I adapted these instructions to create BIOC rules and now want to share my experience with others facing similar challenges. Here’s a detailed guide on using Cortex XDR BIOC rules for PCI-DSS File Integrity Monitoring.
Monitoring Important Logs BIOC Rule
Many FIM implementation guides recommend not monitoring log changes due to the noise they create. However, PCI-DSS 4.0 standard 10.3.4 requires it so I created the following BIOC rule that, after creating correct exclusions, alerts only when someone manually modifies logs, which I found effective.
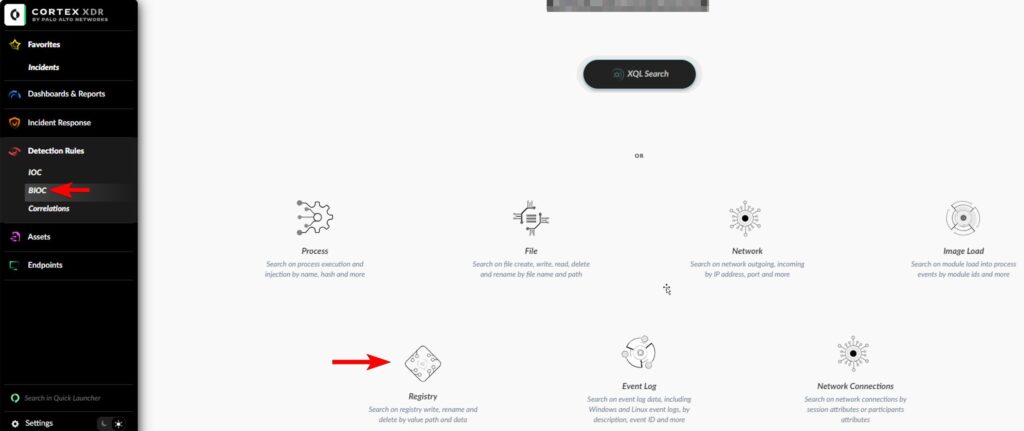
- Navigate to Detection Rules -> BIOC
- Select Add BIOC option

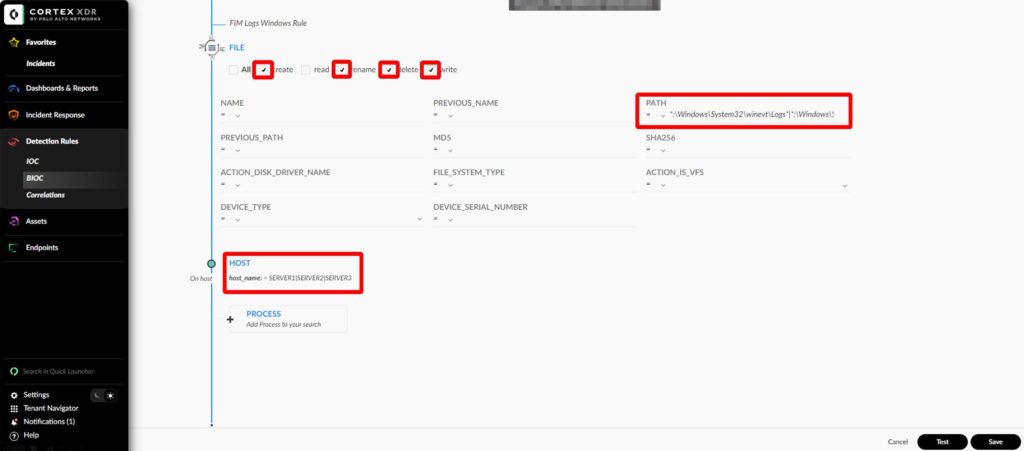
- Select File

- On the BIOC-number page
- Select create, rename, delete and write options
- In the PATH field add following (adjust for your environment)
*:\Windows\System32\winevt\Logs*|*:\Windows\System32\dns\*|*\Windows\System32\dhcp\*|*:\inetpub\logs\LogFiles\*|*:\Microsoft SQL Server\MSSQL*\MSSQL\Log\*- In the HOST NAME field add the servers you want to monitor, e.g.:
SERVER1|SERVER2|SERVER3
- You may use the Test button to check the rule, but be cautious if you have an “Automation Rule” that triggers a computer scan after detection.
- Press Save.
- In the next window:
- Name: Enter the rule name.
- Type: Select an appropriate option; I chose “Tampering.”
- Severity: You may start with low and increase it later, especially if you have a scanning “Automation Rule.”
- OK

It should now be listed under BIOC Rules.

Exclusions
Some FIM rules generate a lot of noise initially, so exclusions might be needed. Ensure exclusions meet QSA requirements and conduct a documented risk assessment. You may set one rule at a time, monitor it, and then proceed to the next.
- Navigate to Settings -> Exceptions Configuration

- Select IOC/BIOC Suppression Rules

- Select Add Rule -> Create New

- On the General step, enter the Rule Name and press Next.

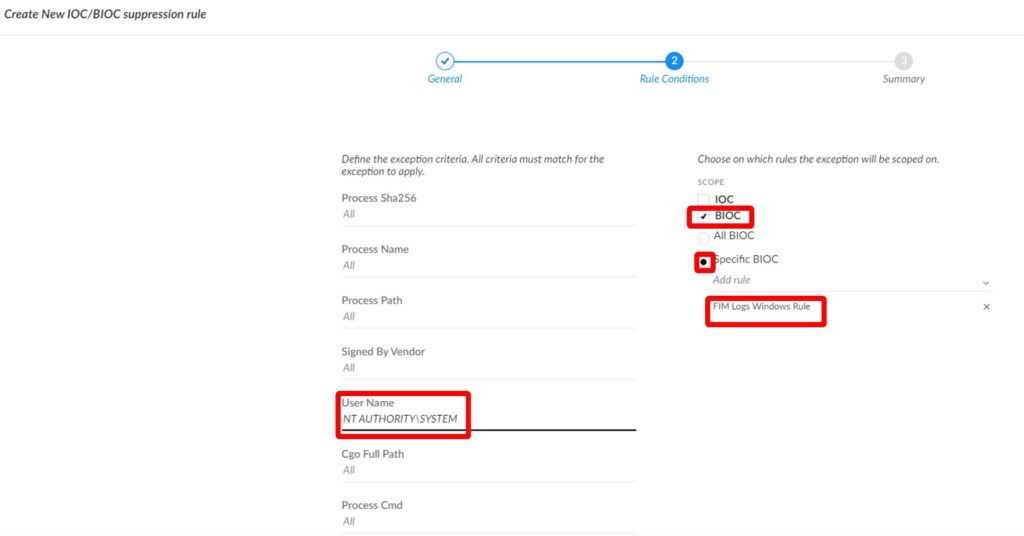
- In Rule Conditions, fill in the following fields:
- Define the exception criteria— in this case, it is the User Name.
- Tick BIOC.
- Select Specific BIOC and add the name of the rule you created.
- OK

- Press Next, review the Summary, and press Create.

Create as many exclusions as required. They should now be listed under IOC/BIOC Suppression Rules.

Monitoring Critical System Files BIOC Rule
- Navigate to Detection Rules -> BIOC.
- Select Add BIOC option.
- Select File.
- On the BIOC-number page:
- Select create, rename, delete, write options.
- In the PATH add following (adjust as needed):
*:\autoexec.bat|*:\boot.ini|*:\config.sys|*:\Windows\system.ini|*:\Windows\win.ini|*:\Windows\regedit.exe|*:\Windows\System32\userinit.exe|*:\Windows\explorer.exe|*:\Program Files\Microsoft Security Client\msseces.exe- In the HOST NAME field, add servers, e.g.,
SERVER1|SERVER2|SERVER3
- You may use the Test button to check the rule.
- Press Save
- Complete the rule creation by filling in Name, Type, and Severity fields.
Monitoring Company Applications BIOC Rule
- Navigate to Detection Rules -> BIOC.
- Select Add BIOC option.
- Select File.
- On the BIOC-number page:
- Select create, rename, delete, write options.
- In the PATH add applications folders, e.g.:
*:\CompanyWebApp\*- In the HOST NAME field, add servers, e.g.,
SERVER1|SERVER2|SERVER3
- You may use the Test button to check the rule.
- Press Save
- Complete the rule creation by filling in Name, Type, and Severity fields.
Monitoring Windows Registry BIOC Rule
- Navigate to Detection Rules -> BIOC.
- Select Add BIOC option.
- Select Registry.

- On the BIOC-number page:
- Select All actions.
- Add the registry keys you want to monitor in the KEY NAME filed. You may use following, which is based on the Microsoft article.
HKEY_LOCAL_MACHINE\SOFTWARE\Microsoft\Cryptography\OID\EncodingType 0\CryptSIPDllRemoveSignedDataMsg{C689AAB8-8E78-11D0-8C47-00C04FC295EE}|HKEY_LOCAL_MACHINE\SOFTWARE\Microsoft\Cryptography\OID\EncodingType 0\CryptSIPDllRemoveSignedDataMsg{603BCC1F-4B59-4E08-B724-D2C6297EF351}|HKEY_LOCAL_MACHINE\SOFTWARE\Microsoft\Windows NT\CurrentVersion\IniFileMapping\SYSTEM.ini\boot|HKEY_LOCAL_MACHINE\SOFTWARE\Microsoft\Windows NT\CurrentVersion\Windows|HKEY_LOCAL_MACHINE\SOFTWARE\Microsoft\Windows NT\CurrentVersion\Winlogon|HKEY_LOCAL_MACHINE\SOFTWARE\Microsoft\Windows\CurrentVersion\Explorer\Shell Folders|HKEY_LOCAL_MACHINE\SOFTWARE\Microsoft\Windows\CurrentVersion\Explorer\User Shell Folders|HKEY_LOCAL_MACHINE\SOFTWARE\Microsoft\Windows\CurrentVersion\Run|HKEY_LOCAL_MACHINE\SOFTWARE\Microsoft\Windows\CurrentVersion\RunOnce|HKEY_LOCAL_MACHINE\SOFTWARE\Microsoft\Windows\CurrentVersion\RunOnceEx|HKEY_LOCAL_MACHINE\SOFTWARE\Microsoft\Windows\CurrentVersion\RunServices|HKEY_LOCAL_MACHINE\SOFTWARE\Microsoft\Windows\CurrentVersion\RunServicesOnce|HKEY_LOCAL_MACHINE\SOFTWARE\WOW6432Node\Microsoft\Cryptography\OID\EncodingType 0\CryptSIPDllRemoveSignedDataMsg{C689AAB8-8E78-11D0-8C47-00C04FC295EE}|HKEY_LOCAL_MACHINE\SOFTWARE\WOW6432Node\Microsoft\Cryptography\OID\EncodingType 0\CryptSIPDllRemoveSignedDataMsg{603BCC1F-4B59-4E08-B724-D2C6297EF351}|HKEY_LOCAL_MACHINE\SOFTWARE\WOW6432Node\Microsoft\Windows NT\CurrentVersion\IniFileMapping\system.ini\boot|HKEY_LOCAL_MACHINE\SOFTWARE\WOW6432Node\Microsoft\Windows NT\CurrentVersion\Windows|HKEY_LOCAL_MACHINE\SOFTWARE\WOW6432Node\Microsoft\Windows NT\CurrentVersion\Winlogon|HKEY_LOCAL_MACHINE\SOFTWARE\WOW6432Node\Microsoft\Windows\CurrentVersion\Explorer\Shell Folders|HKEY_LOCAL_MACHINE\SOFTWARE\WOW6432Node\Microsoft\Windows\CurrentVersion\Explorer\User Shell Folders|HKEY_LOCAL_MACHINE\SOFTWARE\WOW6432Node\Microsoft\Windows\CurrentVersion\Run|HKEY_LOCAL_MACHINE\SOFTWARE\WOW6432Node\Microsoft\Windows\CurrentVersion\RunOnce|HKEY_LOCAL_MACHINE\SOFTWARE\WOW6432Node\Microsoft\Windows\CurrentVersion\RunOnceEx|HKEY_LOCAL_MACHINE\SOFTWARE\WOW6432Node\Microsoft\Windows\CurrentVersion\RunServices|HKEY_LOCAL_MACHINE\SOFTWARE\WOW6432Node\Microsoft\Windows\CurrentVersion\RunServicesOnce|HKEY_LOCAL_MACHINE\SYSTEM\CurrentControlSet\Control\hivelist|HKEY_LOCAL_MACHINE\SYSTEM\CurrentControlSet\Control\Session Manager\KnownDLLs|HKEY_LOCAL_MACHINE\SYSTEM\CurrentControlSet\Services\SharedAccess\Parameters\FirewallPolicy\DomainProfile|HKEY_LOCAL_MACHINE\SYSTEM\CurrentControlSet\Services\SharedAccess\Parameters\FirewallPolicy\PublicProfile|HKEY_LOCAL_MACHINE\SYSTEM\CurrentControlSet\Services\SharedAccess\Parameters\FirewallPolicy\StandardProfile- In the HOST NAME field, add servers, e.g.,
SERVER1|SERVER2|SERVER3
- You may use the Test button to check the rule.
- Press Save
- Complete the rule creation by filling in Name, Type, and Severity fields.
Four rules should now be listed.

After creating all rules, you will have a comprehensive monitoring system. It may take some time to set up all exclusions, but BIOC rules will notify you only if someone changes monitored files, folders, or registry keys.
I hope this guide is helpful to those facing similar challenges. Please leave any comments or questions below.

I have a similar case. Please can you help me? In my case is FIM on Linux Alma.
I haven’t set this for Linux but I will try to help you, however please keep in mind I’m not able to test it so I may be wrong in some points. First you need to know what you want to monitor and I believe good point to start may be https://docs.rapid7.com/insightidr/fim-for-linux/ recommendation which includes:
/bin
/boot
/etc
/sbin
/usr/bin
/usr/local/bin
/usr/local/sbin
/usr/sbin
/usr/share/keyrings
/var/spool/cron
You also need to include your business application folders which are specific for your environment.
I would probably start from creating test rule with one folder and I think home should be sufficient for this purpose. All steps are already in my instruction, just in PATH input /home/my_username/* and of course adjust HOST NAME to your server name. Then create and delete file in the folder and check if this generates any alert.
Once you confirm this works, you should create rules for folders from the list and the business applications. Keep in mind, they may generate a lot of noise so test them and create exceptions following the instruction.
I hope this will help.
Hi Piotr, thank you for sharing this, it’s been extraordinarily helpful. I am trying to set up BIOC rules in my environment, but I’m finding that Agent alerts are being triggered rather than BIOC alerts. I don’t understand the mechanism causing this. The BIOC rule is not part of an agent profile. Any idea?
Thanks!
– Jesse
Hi Jesse,
I’m really sorry, but I’m not sure why this is happening. The article explains how to set BIOC rules, so you should be receiving alerts for them. However, I haven’t worked with Cortex XDR for a while, so it’s possible that something has changed in the meantime.