It’s been a while since my last article (Part 2). In the meantime, Leo (lreading) and I tried very hard to integrate the Python code with the Threat Dragon application. Sadly, due to the lack of Python portability, this attempt ended with the conclusion that the Python code must be translated to JavaScript to provide application reliability. This may take some time, especially as JavaScript lacks the LiteLLM library, which makes AI API connections much easier.
Considering this, I decided to add a GUI to my application and make it easier to use for Threat Dragon users who want an AI-based threat and mitigation generation option. You can find the latest release of the program on my GitHub in the threat-dragon-ai-tool repository:
To make things easier, I compiled the code into executables for Windows x64, Ubuntu x64, macOS x64 and arm64. If your system is not on the list, you can still easily run the Python application after cloning the repository.
How does it work?
First, you need to download the correct archive for your system from GitHub Releases, extract it, open the folder, and run the executable:
https://github.com/InfosecOTB/threat-dragon-ai-tool/releases
While experimenting with the PyInstaller Python compilation tool, I chose to use the --onedir option for Windows and --onefile for Ubuntu and macOS. The reason was startup time. On Windows, it took around 20 seconds to open the application when packaged as a single file, which I found too long. This happens because the executable extracts dependencies to a temporary folder every time it is run, and this process is scanned live by antivirus software. Startup is much faster when the dependencies are placed in a folder beside the executable file.
So, when you extract the Windows version of the program, you will find an _internal folder and td-ai-tool.exe in the same directory. You have to keep them together.

Since startup time on macOS and Ubuntu was not as bad, I decided to compile those versions as a single file.
I tried to make the application as user-friendly as possible, so I ended up with one simple screen:
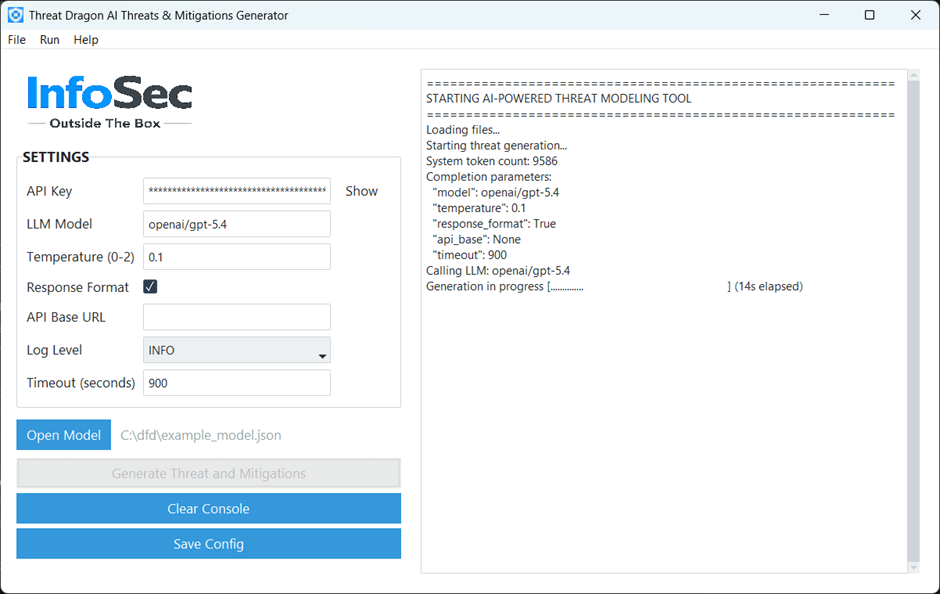
You need to configure the settings first, which are as follows:
- API Key – required for most LLM APIs (unless self-hosted). You need to get it from your AI provider.
- LLM Model – the convention for this setting is determined by LiteLLM, and you can find details in their documentation: https://docs.litellm.ai/docs/providers. In short, it uses a
provider/modelnaming convention (e.g.openai/gpt-5.4,xai/grok-4-latest,anthropic/claude-opus-4-6) with the option to use a large number of different artificial intelligence models. - Temperature – lower values make output more deterministic; higher values increase creativity and randomness. The valid range is 0 to 2. As we are looking for more deterministic results, it is set to 0.1 by default; however, you can experiment with different values if you wish.
- Response Format – if selected, the code sends the required format to the LLM, and the results are supposed to be in valid JSON format. It helps with generating a proper response, but it is not supported by all models/providers. It should be enabled if supported. At the time of writing, it worked well with OpenAI and xAI models, but not so well with others. If this is not supported, you will get an error in the console.
- API Base URL – this is not required for most AI providers, as the API URL is handled by the LiteLLM library. However, if you have a custom self-hosted LLM, you will need to provide this parameter.
- Log Level –
Infoshould be used for normal usage, andDebugonly for troubleshooting. Logs are displayed in the console only. - Timeout (seconds) – request timeout in seconds for LLM API calls. The default is 900 seconds (15 minutes). Usually this is more than enough, but some self-hosted models may require more time.
After entering the settings, you can save them for future use (using “Save Config” button), although this is optional. To follow cyber-security best practices, the API key is saved separately in the OS secure credential store (via keyring) and is not written to config.json (stored in the same folder as the executable), where the rest of the settings are kept.
Once you have configured the settings, you need to open a Threat Dragon .json model file. Then you are ready to go, and you can click the “Generate Threats and Mitigations” button. Before continuing, you will see some important warning information. Because it is important, I have included it below:
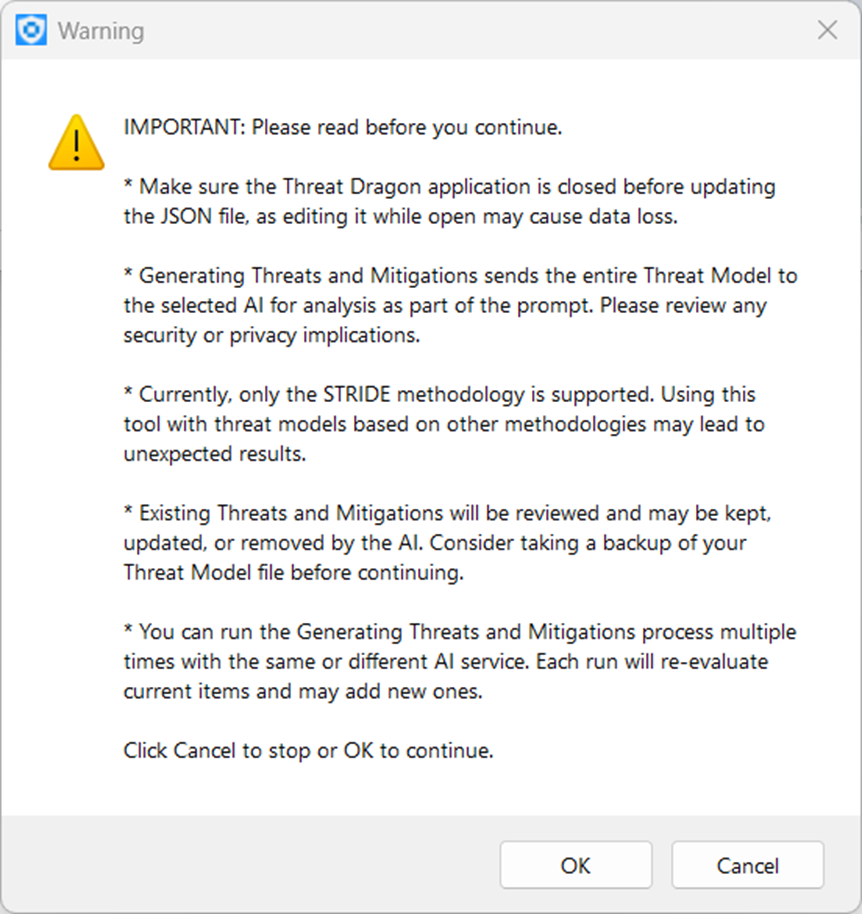
After confirming by clicking OK, the generation process begins. Progress and logs are shown in the console window on the right side of the application. You will also see the results there. Please note that all data will be saved automatically to the model.json file, so make sure you have taken a backup first.
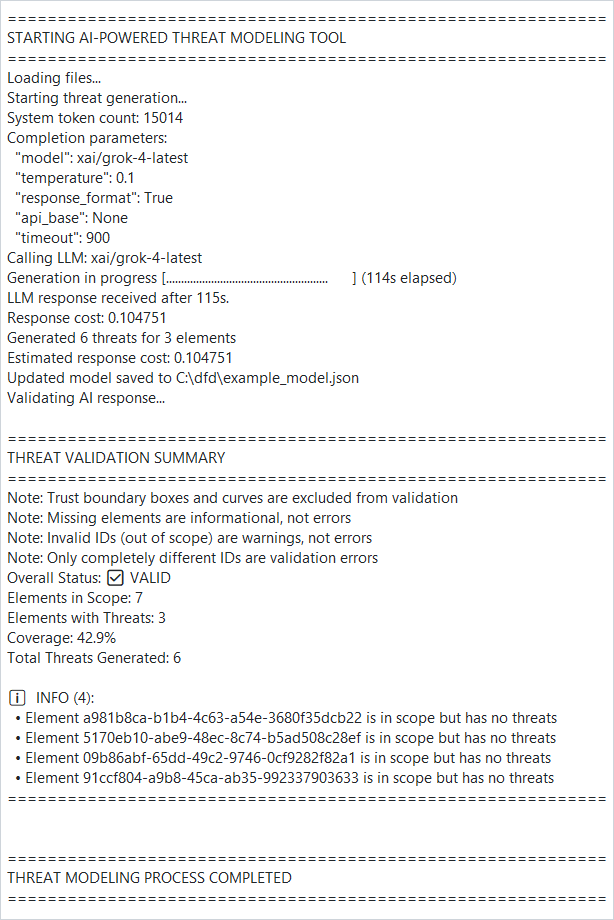
You may run the process several times using the same or a different AI model. Existing threats and mitigations will be reviewed on the next run and adjusted if the AI decides to do so.
The application also has a “Clear Console” button to empty the console window.
One more thing worth mentioning is that the executable is not signed with a trusted certificate, so you may get a Windows or macOS warning, or in some cases execution may be blocked. I have submitted a request for a code-signing certificate to SignPathand hope they will approve it, so the next release will be signed.
I hope you will enjoy using this application, and I would appreciate any feedback.
If you are interested in learning more about the Threat Dragon software and the AI Tool, you can find the other parts of the “AI-Powered Threat Modeling with OWASP Threat Dragon” article series at the links below.