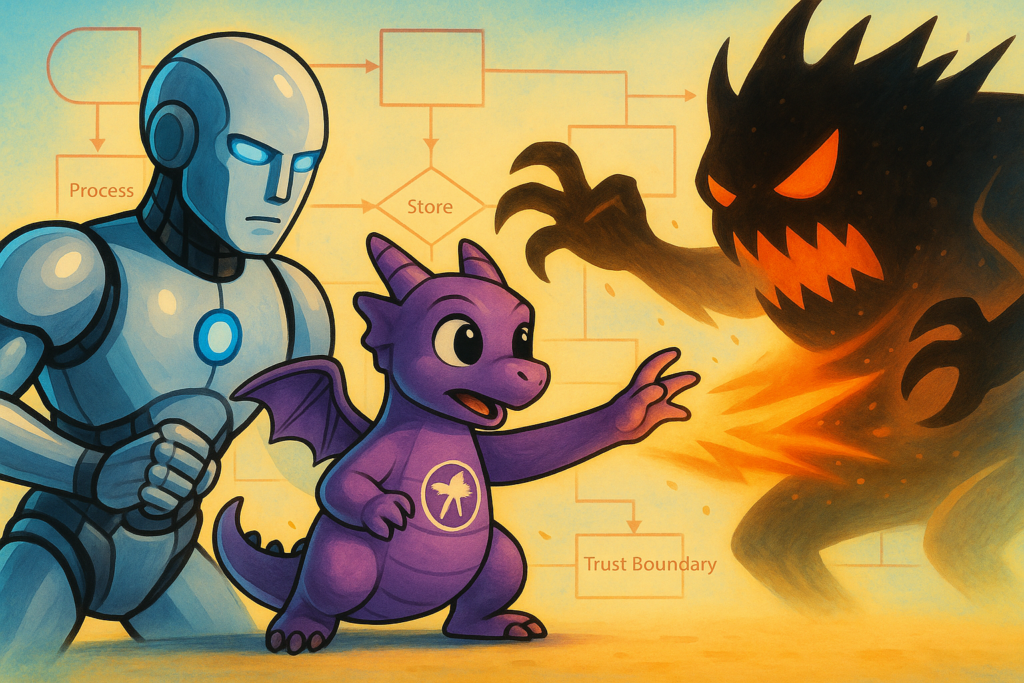
When I started looking for practical ways to use Agentic AI in cybersecurity, one area immediately caught my attention – Threat Modeling. It’s an important part of secure design but often time-consuming and repetitive. So I decided to experiment with OWASP Threat Dragon and built a Python tool that helps automate the process by adding AI-generated threats directly to the diagrams.
Here’s how it works – step by step:
- Create your diagram
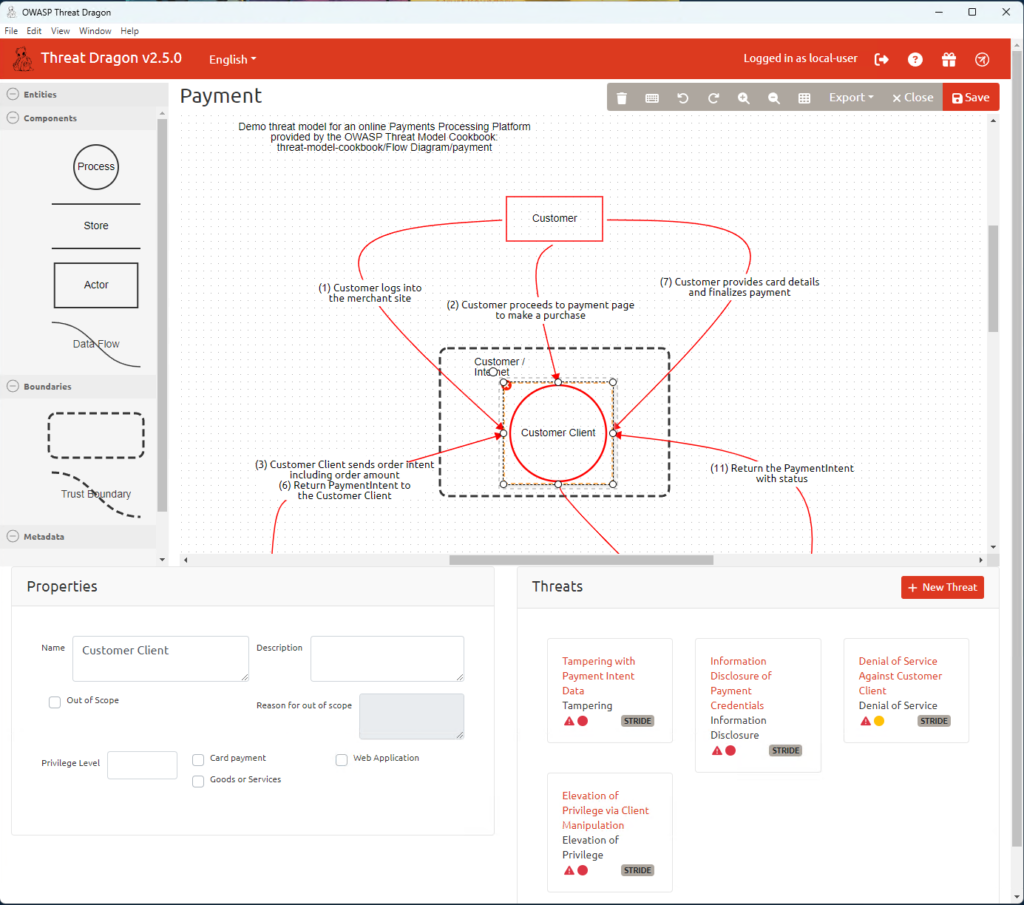
First, make a Data Flow Diagram (DFD) in OWASP Threat Dragon. If you’re not sure how, you can follow Part 1 of this article.
Don’t add any threats or mitigations yet – just save (or copy) thename_of_model.jsonfile into the/inputfolder of the app. - File gets copied
The app copies thatname_of_model.jsonfile into the/outputfolder to work on it. - Run the app
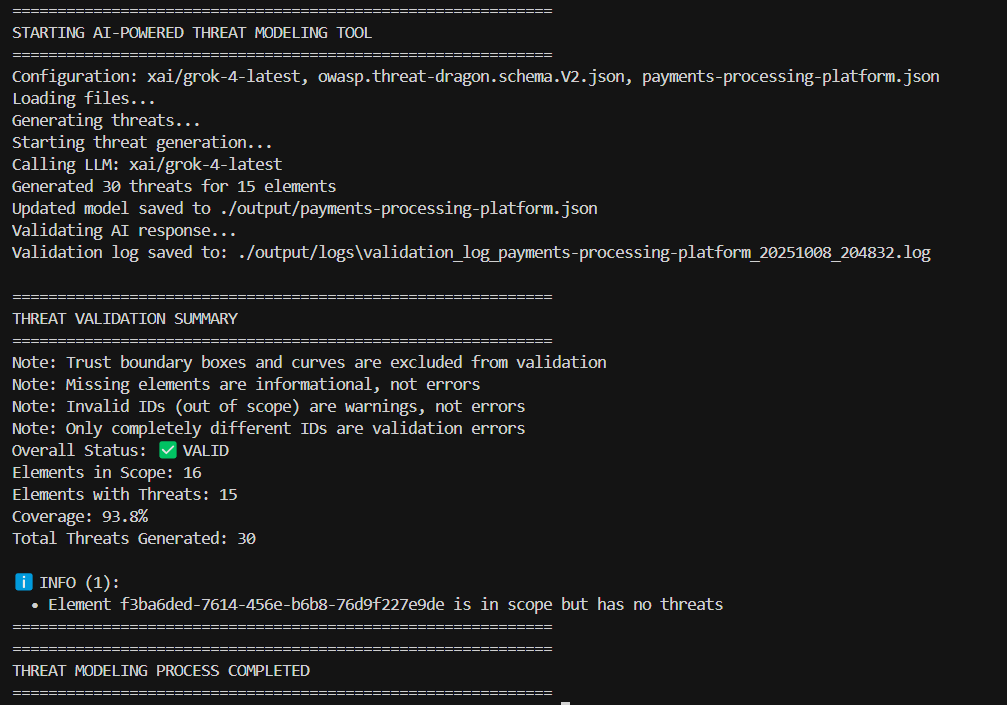
When you run the Python script, it reads your model file along with theowasp.threat-dragon.schema.V2.jsonschema.
Then it builds a special prompt and sends it to the AI model (LLM) to analyze the diagram. - AI does the heavy lifting
The AI looks at the diagram and figures out what threats might apply to the different elements.
It creates a new JSON structure where each key is a cell’s “id” (exactly as in the original file) and the value is a list of threats.
For some LLMs, the app also uses a Pydantic schema to help the model return a clean JSON format. - Check the AI’s work
The app validates the AI’s output using Pydantic to make sure the JSON is correct.
For supported models, it also uses LiteLLM’senable_json_schema_validation = Truefor an extra check. - Update the model
If everything looks good, the threats are added into yourname_of_model.jsonin the/outputfolder. - Final validation + logs
The updated file is validated one more time, and any issues get logged. - Done!
Your Threat Model file (now with AI-generated threats added) is ready in the/outputfolder.
If you’re mainly interested in using the tool, you can go straight to my GitHub:
👉 https://github.com/InfosecOTB/td-ai-modeler
There, you’ll find the README.md with detailed setup and usage instructions. Simply clone the repository, run the program, and you’re good to go.
I’ve also included several example files generated by the tool – you can check them here:
👉 https://github.com/InfosecOTB/td-ai-threat-models
If you’d like to understand how the application was built and the challenges I faced during development, keep reading.
At first, I thought about letting the AI work with the final Threat Dragon report – basically, read the .pdf, understand the diagram picture, and then create a new document with threats and mitigations.
But that idea quickly hit a wall. There’s simply no way to feed that output back into Threat Dragon and updating anything from a PDF would have to be done manually, which completely defeats the purpose.
So, I dropped that plan and went for a better approach – updating the JSON file directly.
To keep it simple, I just sent the whole Threat Dragon .json file to the AI, together with the schema, and asked it to analyze and update it.
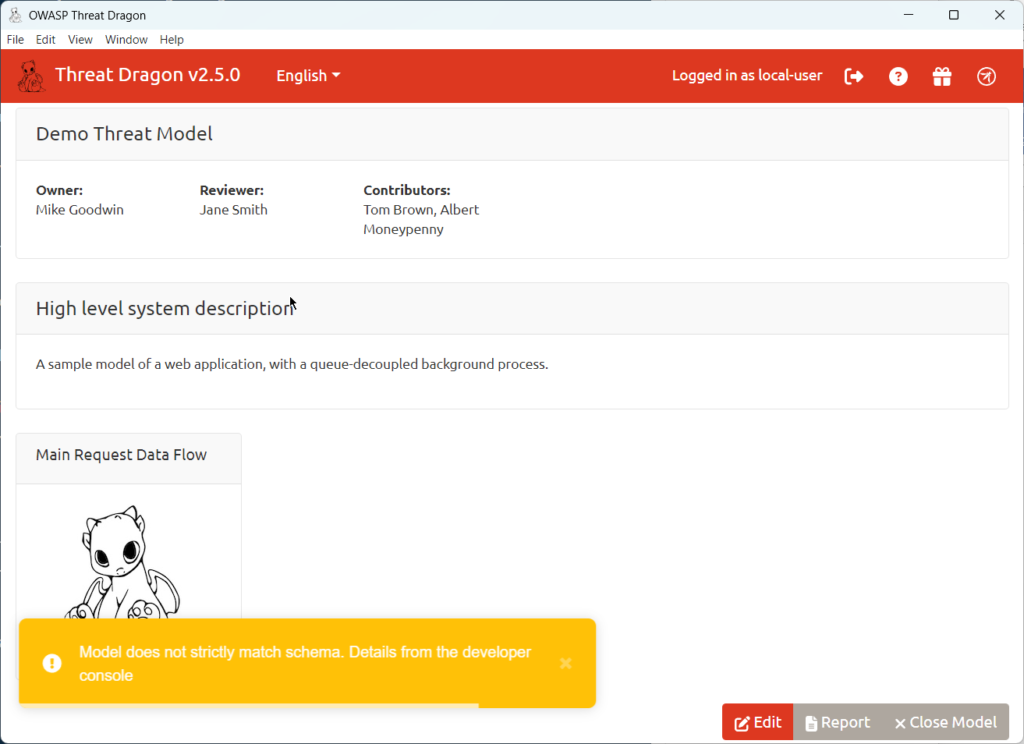
The first attempts didn’t go too well. Most of the time, the AI generated file with schema errors, and sometimes it didn’t generate any threats at all. Still, it was an interesting experiment – it showed pretty clearly how current LLMs handle structured output when working with strict JSON formats.
Eventually, I had to really learn how the Threat Dragon .json file works – luckily for me, Threat Dragon has clear and well-written documentation, including a full JSON schema. Once I understood it, I was able to build a more sophisticated solution.
I ran into a few challenges while coding, but the biggest one was getting the AI to produce correctly structured output. You can say a lot of good things about modern LLMs, but sometimes it’s tricky to make them give you exactly what you want. Unlike traditional programs – where the same input always gives the same output – AI can behave unpredictably. In a way, that’s powerful, but it’s also a bit scary because it feels more like working with a human than with a deterministic computer program.
My next idea was to feed the AI the JSON schema and a model without threats and ask it – just like before – to analyze the diagram, consider all the descriptions, and generate threats with mitigations. But this time, I wanted the AI’s response to be strictly structured: a list of element IDs, each with its threats only.
That turned out to be harder than it sounds. First, I had trouble convincing the AI to copy the exact id values from the elements. At first, most LLMs either copied some other ID or just made up their own. I spent quite a bit of time fine-tuning the prompt to get it right. Now it works pretty reliably – with only a few rare edge cases that I handle in a different way (I’ll explain that later).
Once the AI could copy IDs correctly – which was a critical foundation – the next step was to ensure it placed threats correctly inside the JSON object, matching the Threat Dragon schema. Initially, the AI would sometimes put threats outside the data object, which made them invisible to Threat Dragon. It also sometimes missed required fields.
To solve this, I turned to the amazing Pydantic library in Python. I defined a model that matches the Threat Dragon schema and used it to validate the AI’s output.
At this point, I faced another decision. Originally, I planned to use just one LLM – xAI with its SDK – but I decided to be more ambitious and make the tool flexible, letting users pick the AI model and provider.
For that, I used another great library: LiteLLM. It’s part of my favorite Agentic AI framework: CrewAI (not related to this project – though I plan to use it in the future). LiteLLM makes it easy to connect to most LLM providers through a single, unified interface.
You can find the full list of supported providers here:
👉 https://docs.litellm.ai/docs/providers
For my use case, this list was more than enough. LiteLLM is very simple to use – you just provide an API key and the provider/model name, and in most cases the rest is handled automatically by the library.
Only in rare cases you do need to add the api_base parameter to specify a custom API URL – but usually, LiteLLM figures this out automatically based on the provider and model name.
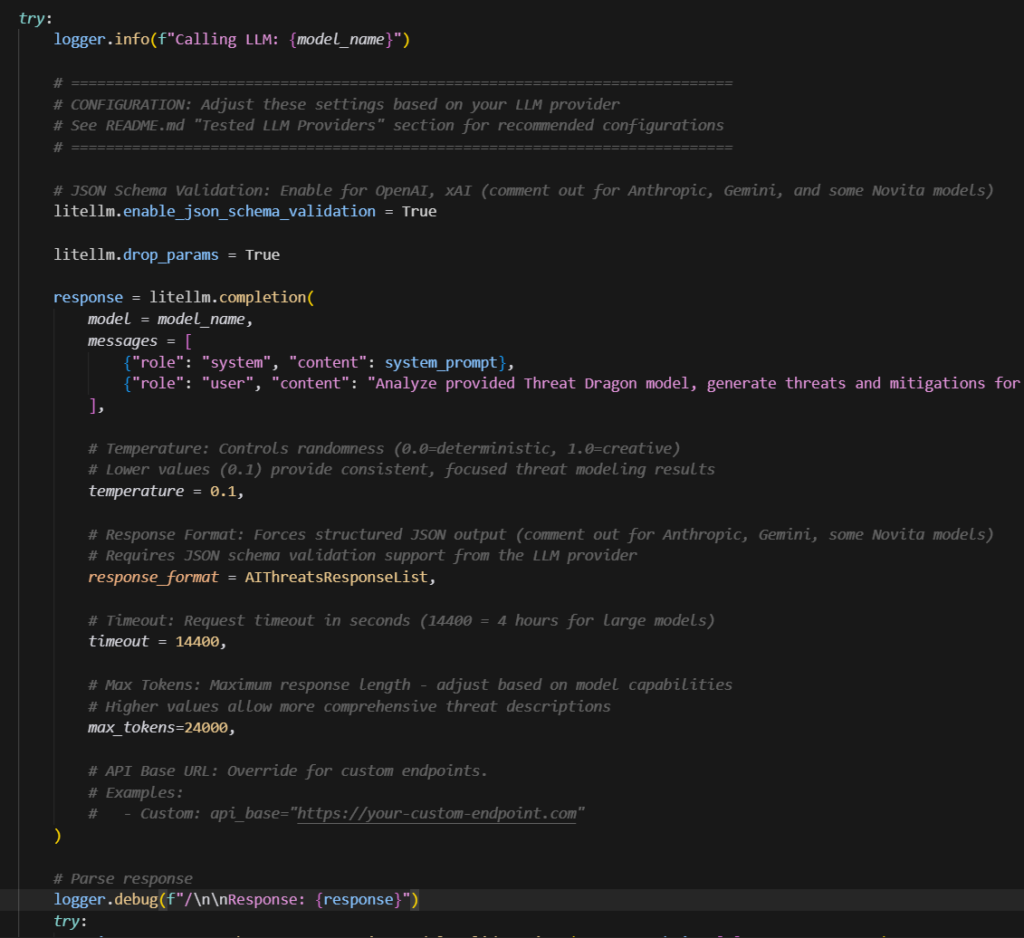
However, LiteLLM also has some parameters that are specific to AI output handling, and one of the most useful ones is output validation.
For example, here are two options I used:
response_format = AIThreatsResponseList
litellm.enable_json_schema_validation = Trueresponse_format– sends a Pydantic model schema to the AI API, forcing it to produce a structured output that matches the model.enable_json_schema_validation– checks if the LLM’s response matches the required format and raises an error if it doesn’t.
The issue is that not all models support these parameters. For example, they work perfectly with openai/gpt-5 and xai/grok-4-latest, but don’t work with Anthropic’s LLMs. If you try to use them with an unsupported model, you’ll get an error during output validation.
To work around this, I added the required schema directly into the prompt, making the approach universal. It’s always better to use the response_format parameter when it’s supported, but if it isn’t, you just comment it out and let the prompt handle the structure.
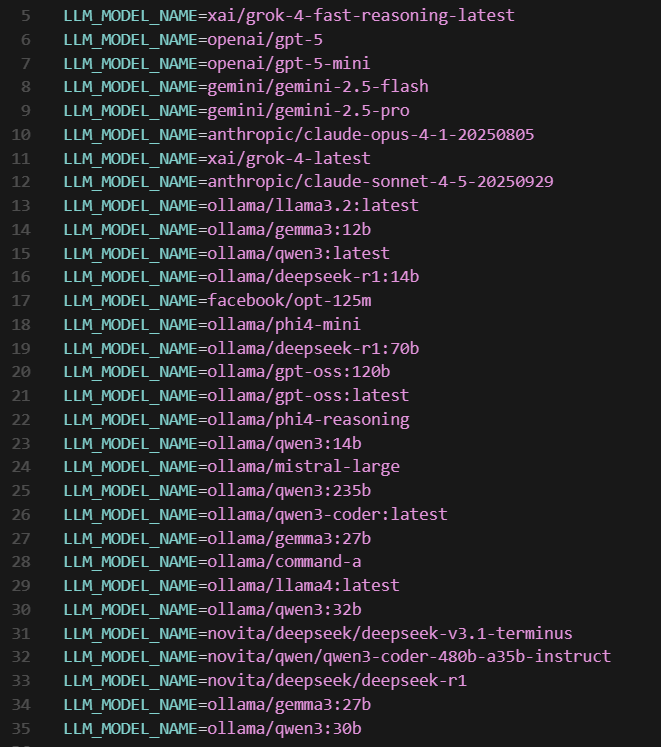
I created a table listing the models I tested and which parameters worked with each of them (if it has # before – it should be commented in code):
| Model | Settings |
| anthropic/claude-sonnet-4-5-20250929 | #litellm.enable_json_schema_validation = False temperature = 0.1, #response_format = AIThreatsResponseList, max_tokens=24000, |
| anthropic/claude-opus-4-1-20250805 | #litellm.enable_json_schema_validation = False temperature = 0.1, #response_format = AIThreatsResponseList, max_tokens=24000, |
| novita/deepseek/deepseek-r1 | #litellm.enable_json_schema_validation = False temperature = 0.1, #response_format = AIThreatsResponseList, max_tokens=16000, |
| novita/qwen/qwen3-coder-480b-a35b-instruct | #litellm.enable_json_schema_validation = False temperature = 0.1, #response_format = AIThreatsResponseList, max_tokens=24000, |
| novita/deepseek/deepseek-v3.1-terminus | #litellm.enable_json_schema_validation = False temperature = 0.1, #response_format = AIThreatsResponseList, max_tokens=24000, |
| ollama/gemma3:27b | #litellm.enable_json_schema_validation = False #temperature = 0.1, response_format = AIThreatsResponseList, max_tokens=24000, |
| xai/grok-4-fast-reasoning-latest | litellm.enable_json_schema_validation = True temperature = 0.1, response_format = AIThreatsResponseList, max_tokens=24000, |
| xai/grok-4-latest | litellm.enable_json_schema_validation = True temperature = 0.1, response_format = AIThreatsResponseList, max_tokens=24000, |
| openai/gpt-5 | litellm.enable_json_schema_validation = True temperature = 0.1, response_format = AIThreatsResponseList, max_tokens=24000, |
| openai/gpt-5-mini | litellm.enable_json_schema_validation = True temperature = 0.1, response_format = AIThreatsResponseList, max_tokens=24000, |
| gemini/gemini-2.5-pro | #litellm.enable_json_schema_validation = True temperature = 0.1, #response_format = AIThreatsResponseList, max_tokens=24000, |
As you can see, I added quite a few models to the table – but in reality, I tested even more.
I didn’t include any locally installed LLMs, mainly because I couldn’t get consistent or reasonable results from them. I installed Ollama on my computer, but since it’s mostly an office machine, I could only run the smallest models, and they didn’t perform well. Later, I tried again on my son’s gaming PC – the models ran better there, but the results were still not good enough. (I’ve uploaded a few sample outputs from those tests to my GitHub repository if you’re curious.)
That said, the connection and processing worked, so I’m convinced that with a more powerful machine, it’s absolutely possible to use self-hosted AI for threat analysis. This could be especially valuable for organizations that, due to security or compliance policies, can’t use public AI models. I also managed to get decent results using Novita-hosted Deepseek and Qwen models.
Now, about costs – the whole process was surprisingly cheap. Over several weeks of development and testing, I tried a large number of models and providers, constantly fixing and tuning the app. I don’t know the exact total, but I’d estimate it cost me less than €50 across all providers. So, running a single analysis would probably cost just a few cents – maybe up to a dozen – which is a great deal considering how much time it can save.
After all that testing, I finally started getting properly formatted outputs. For models that didn’t support the litellm.enable_json_schema_validation = True parameter, I added my own validation module to check if the output format was correct and show an error if not.
Once the output passed validation, another piece of code updated the copied model’s .json file, adding threats by matching elements based on their “id” – which is why copying the exact ID was so important.
Another challenge was that each threat also needed (or at least should have) a unique ID. At first, I tried convincing the AI to generate them using the UUID standard, but the results were mostly random or funny, so I decided to handle that part directly in the code. Now the app automatically generates a unique ID for each threat.
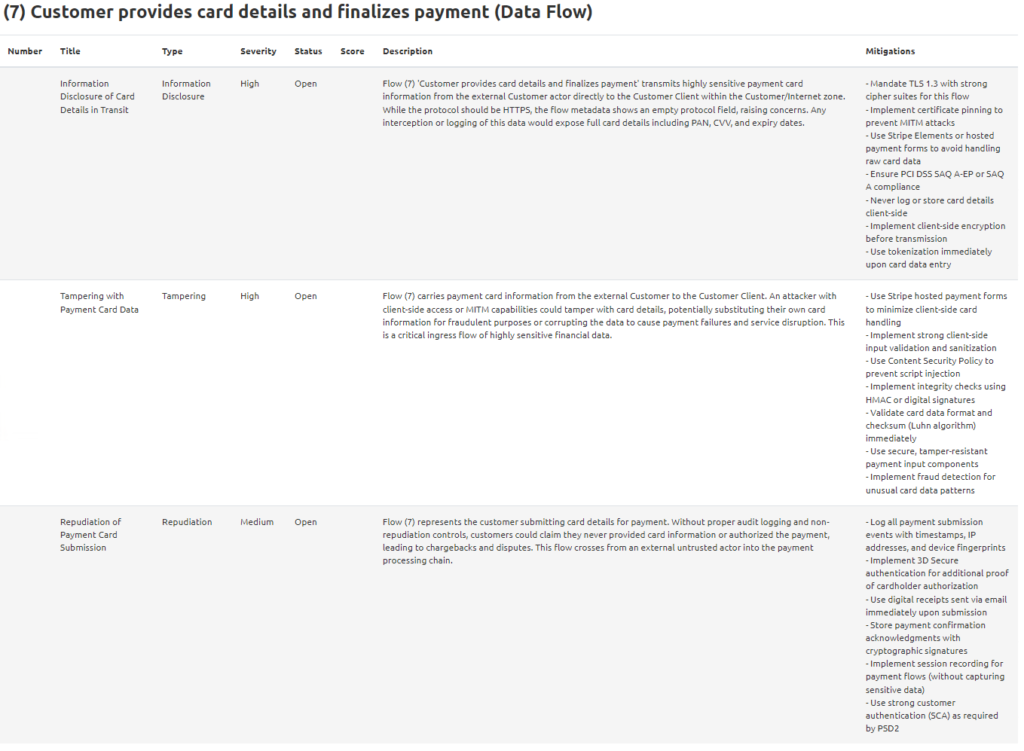
I also added a small feature that changes the element’s color to red when a threat is added. There are also filters: if an element is marked as Out of Scope or is part of a Trusted Boundary, threats aren’t added, no matter what the AI suggests. And as a final touch, I added logging – all logs are saved in the /output/logs folder, so you can review what happened during the analysis.
Overall, everything worked quite well. Some AIs still skip a few elements (sometimes correctly, sometimes not), and some models occasionally use invalid IDs, which prevents the threats from being added.
To catch these issues, I wrote another output validation function that checks the final .json file against the AI output, showing statistics and errors if anything doesn’t match.
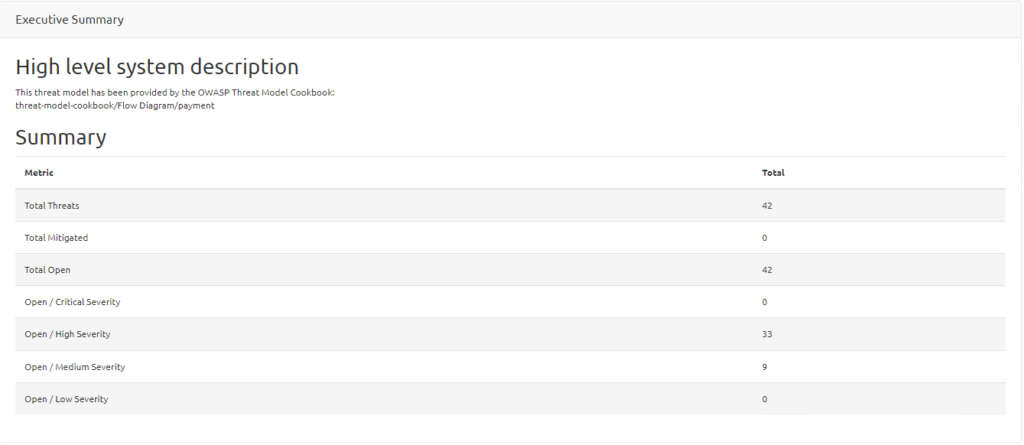
I think the results are really good – and this tool can save a huge amount of time for any cybersecurity engineer or architect doing threat modeling. I’d love to hear about your own experiences or any suggestions you might have.
I’m already planning the next step – a module that will let an LLM validate threat modeling results, not only the ones created by AI but also human-made ones.
That will be the final part of this project before I move on to my next AI experiment – because I’m still completely fascinated by this amazing and incredibly powerful technology.